> For the complete documentation index, see [llms.txt](https://docs.buildnatively.com/llms.txt). Markdown versions of documentation pages are available by appending `.md` to page URLs; this page is available as [Markdown](https://docs.buildnatively.com/guides/integration/audio-player.md).
# Audio Player
Native Audio Player allows you to integrate background audio playback into your mobile app. By bridging your web app with native iOS and Android audio engines, you can provide a seamless listening experience that continues even when the app is minimized or the device is locked.
## Natively Dashboard Setup
Before your app can communicate with the device's hardware, the Audio Player capability must be activated in your build settings. This step injects the necessary native code into your iOS and Android builds.
1. Go to Features > Notifications > Audio Player.
2. Switch it to Enabled.
3. Save Changes.
{% hint style="warning" %}
You must rebuild your application for these changes to take effect.
{% endhint %}
### Implementation
Choose your integration method below: **Bubble.io Plugin** (No-Code) or **JavaScript SDK** (Code).
#### Initialization
{% tabs %}
{% tab title="Bubble.io Plugin" %}
**Check Plugin**
Before starting, verify if the Natively plugin is already installed in your Bubble project.
1. Open your Bubble editor and navigate to the Plugins tab in the left sidebar.
2. **Check Installed Plugins:** Look through your list of installed plugins for "Natively iOS & Android app builder".
* If it IS installed: Check the version number. If an update is available (e.g., you see a button saying "Update"), click it to ensure you have the latest features and bug fixes.
If it is NOT installed: Click the + Add plugins button , search for "Natively", and click Install.
{% endtab %}
{% tab title="Javascript SDK" %}
**Check SDK**
Before writing any logic, ensure the Natively SDK is correctly installed and up-to-date in your codebase.
1. Open your project's main HTML file (or header settings) and look for the Natively script tag inside the `` section.
2. Install/Update: If missing or outdated, add the following code. You can specify the SDK version in the URL (e.g., `@2.25.2`).
```javascript
```
{% endtab %}
{% endtabs %}
#### Setup logic
{% tabs %}
{% tab title="Bubble.io Plugin" %}
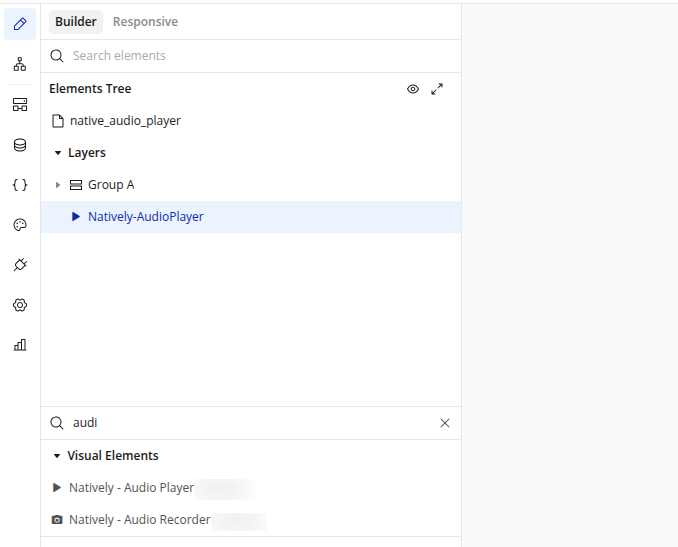
Drag the Natively - Audio Player element onto your page.
{% hint style="warning" %}
This element must be set to Visible on page load to initialize correctly. It should be placed directly on the page root and not inside hidden containers, such as Popups, Floating Groups, Group Focus elements, or Repeating Groups. To hide the element from your UI, you may set its dimensions to 0x0 px.
{% endhint %}
{% hint style="warning" %}
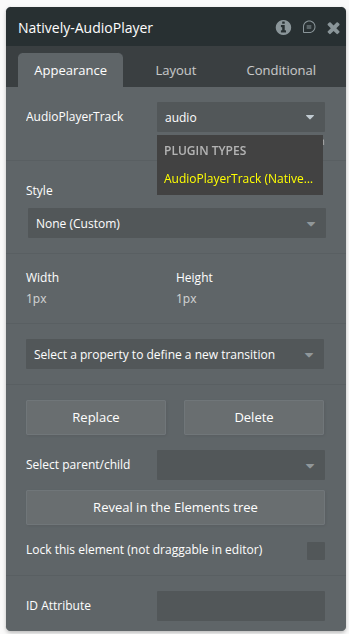
For the Queue Track list to display data, set the AudioPlayerTrack (Natively - Objects) data type.
{% endhint %}
**Element Logic (Events, States, & Actions)**
These triggers allow you to run workflows when the player's status changes on the device.
* Events:
* Track Started: Fires as soon as audio begins coming out of the device's speakers. Use this to change your UI to a "Now Playing" mode.
* Playback Error: Triggered if a file fails to load, a URL is broken, or the network connection is lost. The specific reason will be available in the **Error Message** state.
* Item Added To Queue: Fires after a successful `Queue Add` action.
* Metadata Updated: Triggered whenever the track’s title, artist, or artwork is successfully updated with the `Set Metadata` action.
* Set Metadata Error: Fires if the player fails to update the song information (usually due to a malformed JSON in the "Extras" field).
* Queue Refreshed: Triggered after the `Queue Get` action successfully retrieves the full list of tracks and populates the **Queue Tracks** state.
* States:
* `Status` (Text): Returns the current operational status (e.g., `SUCCESS`).
* `Queue Length` (Number): The total count of tracks in the current list.
* `Current Index` (Number): The position of the track currently playing.
* `Is Playing` (Yes/No): Returns Yes if audio is active.
* `Error Message` (Text): Returns the description of the error encountered during a failure.
* `Queue JSON` (Text): The raw technical data of the entire queue.
* `Queue Track` (List of AudioPlayerTrack (Natively - Objects)): The actual list of tracks recognized by Bubble for use in Repeating Groups.
* Actions:
* Play: Starts audio playback. This action overrides the current queue if a new source is provided.\
`ID` (Text): A unique identifier for the track.\
`Source` (Text): The direct URL to the audio file.\
`Title` (Text): The track name shown in system controls.\
`Artist` (Text): The performer name shown in system controls.\
`Album` (Text): The album name.\
`Genre` (Text): The music or content genre.\
`Artwork URL` (Text): The URL for the cover image.\
`Duration` (Number): Total length of the track in seconds.\
`Extras` (JSON) (Text): Custom metadata stored as a JSON string (e.g., `{"key": "value"}`).\
`Is Stream` (Yes/No): Set to Yes for live radio or continuous streams.\
`Headers` (JSON) (Text): Custom HTTP headers for authentication/requests (e.g., `{"key": "value"}`).\
`Autoplay` (Yes/No): If Yes, playback starts immediately upon loading.\
`Start Position` (Number): The time (in seconds) where playback should begin.\
`Volume` (Number): The initial playback volume (0.0 to 1.0).\
`Speed` (Number): The initial playback rate (0.5 to 3.0).
* Queue Add: Adds a new track to the list. Supports all parameters found in the Play action, with the addition of `Play Now` (Yes/No). If `Play Now` is checked, the player immediately switches to this track.
* Queue Remove: Removes a specific track from the list based on its numerical position (e.g., Index 0, 1, 2).
* Queue Get: Fetches the latest list of tracks from the native audio player to update the `Queue Track` and `Queue JSON` states.
* Pause: Suspends playback at the current position.
* Stop: Ends playback and resets the track position.
* Seek: Jumps to a specific time (in seconds) within the current track.
* Set Volume: Adjusts the player's loudness (0.0 to 1.0).
* Set Speed: Adjusts the playback rate (0.5 to 3.0).
* Set Metadata: Updates the information displayed on the device's lock screen and system media center without interrupting playback.\
`ID` (Text): Updated unique identifier of the track.\
`Title` (Text): Updated track name.\
`Artist` (Text): Updated performer name.\
`Album` (Text): Updated album name.\
`Genre` (Text): Updated genre.\
`Artwork URL` (Text): Updated URL for the cover image.\
`Duration` (Number): Updated total track length.\
`Extras (JSON)` (Text): Updated custom JSON metadata (e.g., `{"key": "value"}`).
{% endtab %}
{% tab title="Javascript SDK" %}
```javascript
// ============================================================================
// NATIVELY AUDIO PLAYER - DOCUMENTATION & EXAMPLES
// ============================================================================
// Initialize
const player = new NativelyAudioPlayer();
// ============================================================================
// ALL AVAILABLE METHODS & PARAMETERS
// ============================================================================
// player.play(sourceUrl, options, callback);
// - Starts playback of an audio file or stream. Overrides the current queue.
// - sourceUrl (String): The direct URL to the audio file or stream.
// - options (Object): Configuration and metadata.
// * id (String): A unique identifier for the track.
// * title (String): The track name shown in system controls.
// * artist (String): The performer name shown in system controls.
// * album (String): The album name.
// * genre (String): The music or content genre.
// * artwork (String): The URL for the cover image.
// * duration (Number): Total length of the track in seconds.
// * extras (Object): Custom metadata stored as a native JS object.
// * headers (Object): Custom HTTP headers for authentication/requests.
// * is_stream (Boolean): Set to true for live radio or continuous streams.
// * autoplay (Boolean): If true, playback starts immediately upon loading.
// * start_position (Number): The time (in seconds) where playback should begin.
// * volume (Number): The initial playback volume (0.0 to 1.0).
// * speed (Number): The initial playback rate (0.5 to 3.0).
//
// player.pause(callback);
// - Pauses the currently playing track.
//
// player.stop(callback);
// - Stops playback completely and resets the player's internal state.
//
// player.seek(positionInSeconds, callback);
// - Jumps to a specific timestamp in the current track.
// - positionInSeconds (Number): The exact time in seconds.
//
// player.setVolume(volumeLevel, callback);
// - Adjusts the player volume.
// - volumeLevel (Number): Accepts values from 0.0 (mute) to 1.0 (max).
//
// player.setSpeed(speedMultiplier, callback);
// - Changes the playback speed.
// - speedMultiplier (Number): Accepts values like 1.0 (normal), 2.0 (double).
//
// player.queueAdd(sourceUrl, options, callback);
// - Adds a track to the background playlist.
// - sourceUrl (String): The direct URL to the audio file or stream.
// - options (Object): Accepts all metadata properties from the `play` options.
// * play_now (Boolean): If true, interrupts current playback. If false, appends to queue.
//
// player.queueGet(callback);
// - Returns the current state of the playlist.
// - Callback Response Object includes:
// * status (String): "SUCCESS" or "ERROR".
// * queue (Array): Array of native JS objects representing queued tracks.
// * queue_length (Number): Total number of tracks in the queue.
// * current_index (Number): Array index (starting at 0) of the currently playing track.
// * position (Number): Exact real-time playback position in seconds.
//
// player.queueRemove(index, callback);
// - Removes a specific track from the queue.
// - index (Number): The numeric index of the track in the array (e.g., 0 for the first item).
//
// player.setMetadata(metadata, callback);
// - Updates the lock-screen/system metadata on the fly without interrupting playback.
// - metadata (Object): Contains the updated fields.
// * id (String): Updated unique identifier.
// * title (String): Updated track name.
// * artist (String): Updated performer name.
// * album (String): Updated album name.
// * genre (String): Updated genre.
// * artwork (String): Updated URL for the cover image.
// * duration (Number): Updated total track length.
// * extras (Object): Updated custom JSON metadata.
// --- Audio Player. Quick Start (Basic Playback). Start ---
// 1. DEFINE CALLBACKS
const playbackHandler = function(resp) {
if (resp && resp.status === "SUCCESS") {
console.log("Playback started successfully.");
} else {
const errorMsg = resp ? resp.message : "Unknown playback error";
console.error("Failed to play:", errorMsg);
}
};
const controlHandler = function(resp) {
console.log("Action Status:", resp ? resp.status : "Unknown");
};
// 2. CONFIGURATION (Track Details)
const audioSource = "https://example.com/audio/sample-track.mp3";
const trackOptions = {
id: "track_123",
title: "Awesome Podcast Episode",
artist: "Natively",
album: "SDK Tutorials",
artwork: "https://example.com/images/cover.jpg",
autoplay: true,
volume: 1.0,
is_stream: false // Set to true for live radio URLs
};
// 3. CORE FLOW
// Start playing a track, then pause it after a hypothetical user click
player.play(audioSource, trackOptions, playbackHandler);
// Sometime later...
// player.pause(controlHandler);
// player.stop(controlHandler);
// --- Audio Player. Quick Start (Basic Playback). End ---
// --- Advanced Usage: Queue Management & Controls. Start ---
// 1. ADD TO QUEUE
const nextTrackSource = "https://example.com/audio/next-track.mp3";
const nextTrackOptions = {
title: "Up Next: Tech News",
artist: "Natively",
play_now: false // Appends to the end of the queue silently
};
player.queueAdd(nextTrackSource, nextTrackOptions, (resp) => {
if (resp && resp.status === "SUCCESS") {
console.log(`Track added! Queue now has ${resp.queue_length} items.`);
} else {
console.error("Failed to add to queue:", resp.message);
}
});
// 2. GET QUEUE STATUS
player.queueGet((resp) => {
if (resp && resp.status === "SUCCESS") {
console.log("Current Queue Array:", resp.queue); // Array of track objects
console.log("Total Tracks:", resp.queue_length);
console.log("Currently Playing Index:", resp.current_index);
console.log("Exact Playback Position:", resp.position); // e.g., 45.2 seconds
} else {
console.error("Failed to fetch queue data:", resp.message);
}
});
// 3. REMOVE FROM QUEUE (e.g., Remove the 2nd item - index 1)
player.queueRemove(1, (resp) => {
if (resp && resp.status === "SUCCESS") {
console.log(`Track removed. ${resp.queue_length} items remaining.`);
}
});
// 4. ON-THE-FLY CONTROLS (Seek & Volume)
// Jump to the 30-second mark
player.seek(30, (resp) => {
if (resp && resp.status !== "SUCCESS") console.error("Seek failed:", resp.message);
});
// Reduce volume to 50%
player.setVolume(0.5, (resp) => console.log("Volume adjusted:", resp.status));
// --- Advanced Usage: Queue Management & Controls. End ---
```
{% endtab %}
{% endtabs %}
#### How to use
{% tabs %}
{% tab title="Bubble.io" %}
This guide covers the standard implementation of the Native Audio Player in your Bubble application, from playing a single track to building a complete queue-based playlist.
**Step 1: Place the Element on the Page**
To initialize the player, you must place the Native Audio Player element onto your Bubble page.
* This element is invisible in your live app.
* As soon as the page loads, the element automatically initializes the audio engine and exposes its default states (e.g., `Is Playing` = "no", `Queue Length` = 0).
* Important: Ensure the element is present on the page *before* triggering any workflow actions.
**Step 2: Playing a Single Track**
To immediately play a song or stream, use the Play workflow action.
* Create a workflow trigger (e.g., "When Button Play is clicked").
* Add the action: Element Actions > Play Natively-AudioPlayer.
1. Fill in the required fields:
* Source: The secure link to your audio file (e.g., `.mp3`, `.wav`, or stream URL).
* Artwork URL: (Optional) A link to the track's cover image.
* Metadata: (Optional) Fill in Title, Artist, and Album to display system-level audio controls on the user's device.
**Step 3: Building a Playlist (The Queue System)**
The Native Audio Player features a robust queue system, allowing you to load multiple tracks for continuous playback.
* Queue Add: Use this action to push a new track into the player's background playlist. Set `Play Now` to "checked" if you want the track to interrupt the current audio, or "unchecked" to simply append it to the end of the line.
* Queue Get: Triggers the player to fetch the current state of the playlist. This will populate the element's `Queue Track` state (a list of Bubble objects) and update the P`osition` state.
* Queue Remove: Deletes a track from the playlist based on its numeric index.
**Step 4: Controlling Playback**
Map your custom Bubble UI (buttons, sliders) to the following element actions to control the active audio:
* Pause / Stop: Halts the current playback and automatically sets the element's `Is Playing` state to "no".
* Seek: Jumps to a specific timestamp in the audio. Pass the desired position (in seconds).
* Set Volume / Speed: Adjusts the output dynamically. Volume accepts a value from `0.0` (mute) to `1.0` (max).
**Step 5: Designing a Responsive UI (Using States)**
The plugin automatically pushes real-time data to the element's States, allowing you to build responsive UI elements without complex conditionals.
**Example:** A Play/Pause Toggle Button Instead of guessing if the audio is running, bind your UI directly to the player's data:
* Place an Icon on your page (e.g., a "Play" icon).
* Go to the Icon's Conditional tab.
* Set the condition: `When Native Audio Player A's Is Playing is yes`.
* Change the Icon to a "Pause" symbol.
**Handling Errors gracefully:** If a track fails to load or a URL is invalid, the player will change its `Status` state to `"ERROR"` and populate the `Error Message` state. You can use a Bubble "Do when condition is true" workflow (`When Native Audio Player's status is "ERROR"`) to trigger a popup or alert, notifying the user exactly what went wrong.
{% endtab %}
{% tab title="Javascript SDK" %}
Integrating the Native Audio Player into your web application is straightforward. This guide covers the standard implementation flow, from playing a single track to managing a background playlist and syncing your custom UI.
**Step 1: Initialize the Player**
Before you can play audio, you must initialize the player instance. This should typically be done once when your application or audio component loads.
```javascript
// Initialize the audio engine
const player = new NativelyAudioPlayer();
```
**Step 2: Playing a Single Track**
To immediately play a song, podcast, or live stream, use the `.play()` method. You will need the direct URL to the audio file and an options object for the system metadata (which displays on the user's lock screen).
```javascript
const audioUrl = "https://example.com/audio/sample.mp3";
const trackOptions = {
id: "track_01",
title: "Introduction to Natively",
artist: "The Natively Team",
artwork: "https://example.com/images/cover.jpg",
autoplay: true
};
// Start playback and handle the response
player.play(audioUrl, trackOptions, (resp) => {
if (resp.status === "SUCCESS") {
console.log("Audio is now playing!");
}
});
```
**Step 3: Building a Playlist (Queue System)**
If you are building an app with continuous playback, use the built-in queue system instead of manually tracking what song plays next.
Use `.queueAdd()` to push tracks into the background playlist. If the player is already running, these tracks will seamlessly play back-to-back.
```javascript
// Add a track to the end of the queue silently
player.queueAdd("https://example.com/audio/track_02.mp3", {
title: "Chapter 1",
play_now: false
}, (resp) => {
console.log(`Track added. Queue length: ${resp.queue_length}`);
});
// Interrupt current playback and play this track immediately
player.queueAdd("https://example.com/audio/breaking_news.mp3", {
title: "Breaking News",
play_now: true
});
```
**Step 4: Syncing Your Custom UI**
Because audio playback is asynchronous (users can pause audio via their headphones or lock screen), you should frequently fetch the player's state to keep your custom HTML/CSS UI in sync.
Use `.queueGet()` to retrieve the exact real-time state of the player.
```javascript
function updateInterface() {
player.queueGet((resp) => {
if (resp.status === "SUCCESS") {
// 1. Update your progress bar
document.getElementById("progress").value = resp.position;
// 2. Update your playlist UI
const currentTrack = resp.queue[resp.current_index];
document.getElementById("now-playing-title").innerText = currentTrack.title;
}
});
}
// Call this function periodically (e.g., via requestAnimationFrame or setInterval)
// or whenever a user clicks a control button.
```
**Step 5: Controlling Playback**
Bind the player's control methods directly to your custom UI buttons. Always include a callback to verify the action succeeded before updating your button's visual state (e.g., switching a "Pause" icon to a "Play" icon).
```javascript
// Pause Button Handler
document.getElementById("btn-pause").addEventListener("click", () => {
player.pause((resp) => {
if (resp.status === "SUCCESS") {
// Update UI to show 'Play' icon
}
});
});
// Seek Bar Handler (Jumping to 45 seconds)
document.getElementById("seek-bar").addEventListener("change", (e) => {
const newTime = Number(e.target.value);
player.seek(newTime);
});
```
**Best Practices & Error Handling**
* Sanitize URLs: Ensure all audio and artwork URLs use `https://`. Mixed content (loading `http://` audio on an `https://` site) will be blocked.
* Handle Callbacks: Always check the `resp.status` in your callbacks. If `resp.status === "ERROR"`, log or display the `resp.message` so users know why playback failed (e.g., "Network error" or "File not found").
{% endtab %}
{% endtabs %}
### Live Demo & Editor Example
{% tabs %}
{% tab title="Bubble.io" %}
To see a working implementation of the Native Audio Player - including playlist queues, volume controls, and real-time state bindings - we highly recommend exploring our demo application. You can test the live functionality or open the Bubble Editor to inspect the exact workflow configurations and reverse-engineer the setup for your own app.
* [View Live Demo](https://nativelyqa.bubbleapps.io/version-test/native_audio_player)
* [Inspect in Bubble Editor](https://bubble.io/page?id=nativelyqa\&test_plugin=1654595882459x381599056563798000_current\&tab=Design\&name=native_audio_player\&type=page\&elements=cmQIm0)
{% endtab %}
{% endtabs %}
### Troubleshooting
If the feature isn't behaving as expected, the [Debug Console](/guides/integration/debug-console.md) is your best friend. It reveals the conversation between your web app and the native app.
If you cannot resolve the issue using the logs, our team is here to help. To solve your issue on the first reply, we require a Standardized Bug Report based on your debug data.
Your report must include:
1. App ID: Provide the unique ID found in Natively Dashboard > Settings.
2. Actual Behavior: A clear description of what is happening (or not happening).
3. Expected Behavior: A clear description of what the app should be doing.
4. Steps to Reproduce: A list of the exact actions needed to trigger the error.
5. Console Screenshot: A capture of the Debug Console showing the specific error logs.
6. Logic Configuration: Screenshots of the specific logic where the error occurs (e.g., Bubble workflows, API connectors, or code snippets).
7. Test Credentials: If the issue requires a login to reproduce, provide a set of working test credentials (User/Pass).