> For the complete documentation index, see [llms.txt](https://docs.buildnatively.com/llms.txt). Markdown versions of documentation pages are available by appending `.md` to page URLs; this page is available as [Markdown](https://docs.buildnatively.com/guides/integration/localization.md).
# Localization
To provide a truly native experience, Natively supports localized Permission Descriptions and App Names. When a user's device is set to one of the following languages, the system will automatically display the corresponding translation you have provided in the dashboard.
### Supported Languages
Natively currently supports AI-powered and manual translation for the following locales:
* English (Default Base)
* Arabic
* Chinese (Simplified)
* Dutch
* French
* German
* Italian
* Korean
* Portuguese
* Spanish
{% hint style="warning" %}
If a user's device is set to a language not included in your active translations, the app will fall back to the app's primary language.
{% endhint %}
### Managing Feature Translations
Localization is handled within the specific configuration of each feature to ensure context is maintained.
#### The workflow
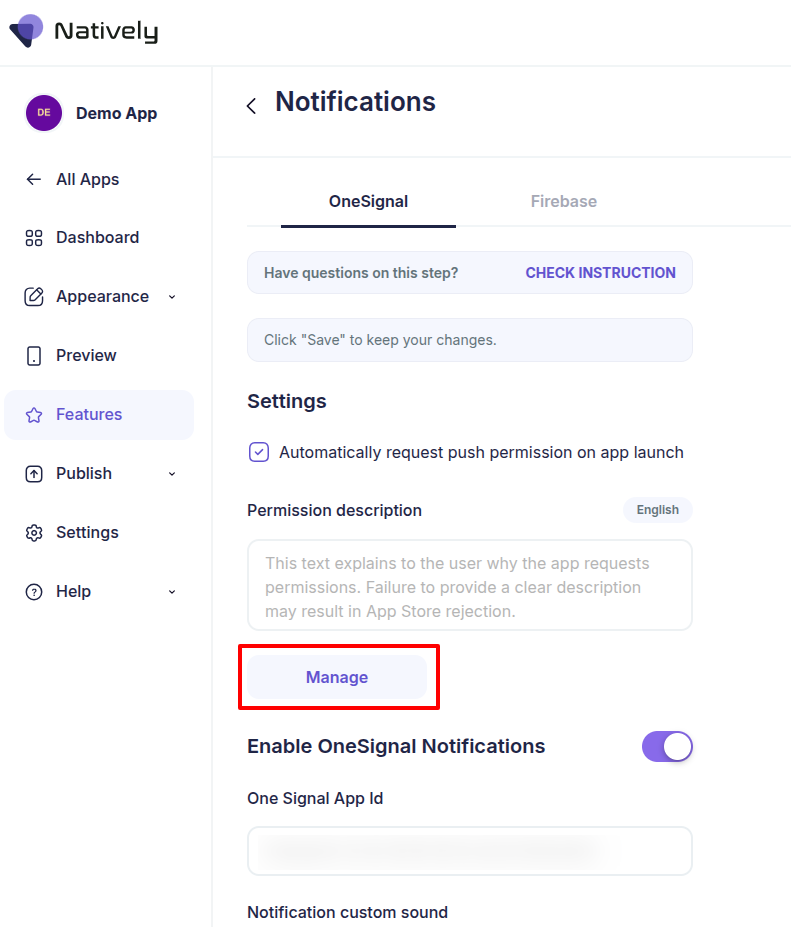
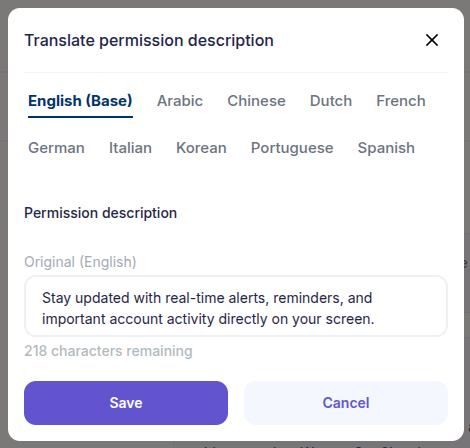
1. **Accessing Translations:** Navigate to the Features tab, select a feature (e.g., Notifications or Camera), and click Manage under the Permission description section.\
2. **The "Base Language":** Your primary language acts as the "Source of Truth." Finalize your primary text first before proceeding to other languages.\
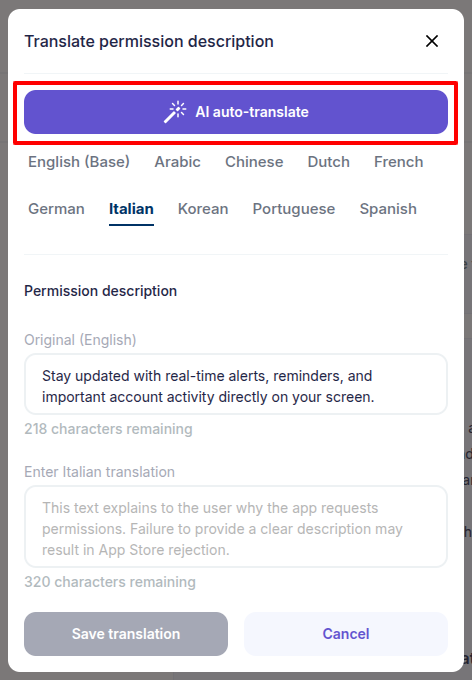
3. **Individual Translation:** Select a target language tab (e.g., Italian). You can manually type your text or use the AI auto-translate button for an instant draft.\
### Global Bulk Translations
To save time when managing several features, use bulk synchronization actions.
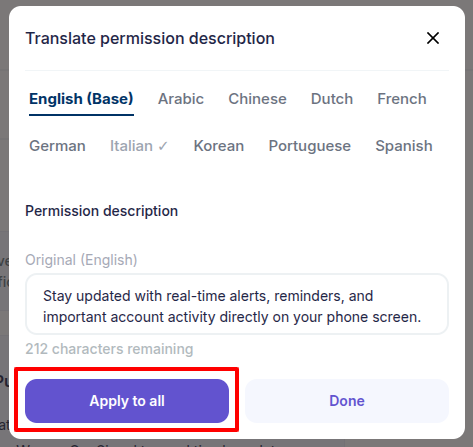
**Apply to all**: If you update your primary base text, use the Apply to All button in the translation drawer to sync that change across all other active languages instantly.
{% hint style="warning" %}
This action will overwrite all existing manual translations for that feature. Use this only when you have made significant changes to your core messaging.
{% endhint %}
### Verification & Best Practices
Following these rules will protect your app from being rejected during the App Store or Google Play review process.
* **Character Limits:** Mobile systems have strict UI limits. If your permission description is too long, the counter will turn red.
* **Manual Review:** Always verify AI-generated text. Automated translations can sometimes miss technical context or use a tone that doesn't fit your brand.
* **Truncation Warning:** Be aware that Romance languages (such as Spanish, French, Italian, and Portuguese) are typically 30–35% longer than English. If an automated translation exceeds the limit, the system will automatically truncate (cut off) the text. This often happens in the middle of a sentence, causing the description to lose its meaning and potentially leading to App Store rejection.
* **Sync Status:** Monitor your translation manager for these indicators:
* ✓ Saved and ready for build.
* ⚠️ Your translation is outdated.
### Changing the Primary App Language
Changing your Primary Language in the App Settings is a global action that affects your entire project.
1. **Global Update:** Changing the base language triggers an automatic AI re-translation of every Permission Description in your app to match the new source.
2. **Manual Audit:** After a base language change, you must manually verify all features before build.
{% hint style="info" %}
**Note on App Store Listings**\
Please note that the primary language you select here will also dictate the default language visible for your application in the Apple App Store and Google Play Store.
{% endhint %}
### App Name Localization
The App Name is localized separately within the App Settings. This ensures that the primary identity of your app remains consistent or is specifically tailored to each market.
Unlike Permission Descriptions, the App Name is NOT automatically translated when you add a new language through the Feature Translation drawer.
Before triggering a new build, please navigate to App Settings to verify that your App Name has been correctly translated for all active languages.
### Permission Description Templates
Use these templates as a baseline to ensure your app meets Apple and Google’s strict transparency requirements.
{% hint style="warning" %}
**Disclaimer:** These are examples only and are not "ready-to-use" final texts. Every app has individual and unique reasons for requesting hardware access. You must always be transparent and specific with your users about *why* your particular app needs a permission. Failing to provide an honest, app-specific reason is the #1 cause for App Store rejections.
{% endhint %}
| Camera | "Use your camera to take profile photos, scan QR codes, and upload images directly to the app." |
| ------------------- | ---------------------------------------------------------------------------------------------------------------------- |
| Photo Library | "Select and upload existing photos from your library to customize your profile and share content." |
| Microphone | "Access to the microphone is required to record voice messages and capture audio for video uploads." |
| NFC | "This allows the app to scan physical NFC tags and interact with supported hardware devices." |
| Location | "Your location is used to provide relevant local content, map features, and personalized recommendations near you." |
| Location Background | "Enable background location to receive important proximity alerts and automated features even when the app is closed." |
| Notifications | "Stay updated with real-time alerts, reminders, and important account activity directly on your screen." |
| Contacts | "Sync your contacts to easily find and connect with friends or colleagues already using the app." |
| Calendars | "Access to your calendar allows you to save important events, book appointments, and stay organized." |
| HealthKit (Read) | "We read your health data to track your fitness progress and provide personalized wellness insights." |
| HealthKit (Write) | "This allows the app to save your activity and health updates directly to your Apple Health dashboard." |
| Apple ATT | "Your data will be used to provide a more personalized experience and deliver content that matches your interests." |
| Admob | "This allows us to show you relevant advertisements and helps keep the app free for all users." |
| Analytics | "We collect anonymous data to understand app performance and improve your user experience with every update." |
### Implementation
Choose your integration method below: **Bubble.io Plugin** (No-Code) or **JavaScript SDK** (Code).
{% tabs %}
{% tab title="Bubble.io" %}
**Check Plugin**
Before starting, verify if the Natively plugin is already installed in your Bubble project.
1. Open your Bubble editor and navigate to the Plugins tab in the left sidebar.
2. **Check Installed Plugins:** Look through your list of installed plugins for "Natively iOS & Android app builder".
* If it IS installed: Check the version number. If an update is available (e.g., you see a button saying "Update"), click it to ensure you have the latest features and bug fixes.
If it is NOT installed: Click the + Add plugins button , search for "Natively", and click Install.
{% endtab %}
{% tab title="Javascript SDK" %}
**Check SDK**
Before writing any logic, ensure the Natively SDK is correctly installed and up-to-date in your codebase.
1. Open your project's main HTML file (or header settings) and look for the Natively script tag inside the `` section.
2. Install/Update: If missing or outdated, add the following code. You can specify the SDK version in the URL (e.g., `@2.25.2`).
```javascript
```
{% endtab %}
{% endtabs %}
#### Setup logic
{% tabs %}
{% tab title="Bubble.io" %}
Drag the Natively - Audio Player element onto your page.
{% hint style="warning" %}
This element must be set to Visible on page load to initialize correctly. It should be placed directly on the page root and not inside hidden containers, such as Popups, Floating Groups, Group Focus elements, or Repeating Groups. To hide the element from your UI, you may set its dimensions to 0x0 px.
{% endhint %}
**Element Logic (Events, States, & Actions)**
Events:
* Locales Received: Fires immediately after a successful `Get Locales` action. Use this event to populate a custom state or a dropdown menu with the newly fetched `Locales` list.
* Locale Updated: Fires immediately after a successful `Set Locale` action. Use this event to refresh the page data or show a "Language updated successfully" alert.
* Error Occurred: Fires if any action fails. Use this to trigger an error popup displaying the element's `Error message` state.
States:
* `Status` (Text): Returns the current operational status (e.g., `SUCCESS`).
* `Error message` (Text): Returns the description of the error encountered during a failure.
* `Locales` (List of texts): An array of all locale codes supported by the app (e.g., `["en", "fr", "es"]`).
* `Current` (Text): The currently active locale code being used by the app (e.g., `"fr"`).
* `Default` (Text): The app's original default or fallback locale.
Actions:
* Get Locales: Retrieves the app's current and default locale details and a list of all supported languages.
* Set Locale: Updates the app's active language to your specified locale code.\
`Locale` (Text): The target language code (e.g., `fr`).
{% endtab %}
{% tab title="Javascript SDK" %}
```javascript
// ============================================================================
// NATIVELY LOCALIZATION - DOCUMENTATION & EXAMPLES
// ============================================================================
// Initialize
const nativelyLocale = new NativelyLocale();
// ============================================================================
// ALL AVAILABLE METHODS & PARAMETERS
// ============================================================================
// nativelyLocale.getLocales(callback);
// - Retrieves the device's supported locales and the current active language.
// - Callback Response Object includes:
// * status (String): "SUCCESS" or "ERROR".
// * locales (Array of Strings): All locale codes supported by the device (e.g., ["en", "fr"]).
// * current (String): The currently active locale code.
// * default (String): The device's original default/fallback locale.
// * message (String): Error details (if status is "ERROR").
//
// nativelyLocale.setLocale(targetLocale, callback);
// - Updates the application's active language to your specified locale code.
// - targetLocale (String): The target language code (e.g., "es").
// - Callback Response Object includes:
// * status (String): "SUCCESS" or "ERROR".
// * message (String): Error details (if status is "ERROR").
// --- Localization. Quick Start & Flow. Start ---
// 1. DEFINE CALLBACKS
const getLocalesHandler = function(resp) {
if (resp && resp.status === "SUCCESS") {
console.log("Current Active Language:", resp.current);
console.log("Device Default Language:", resp.default);
console.log("All Supported Languages:", resp.locales); // e.g., ["en", "fr", "es"]
// Example: You could populate a dropdown menu in your UI using resp.locales here.
} else {
const errorMsg = resp ? resp.message : "Unknown error occurred.";
console.error("Failed to fetch locales:", errorMsg);
}
};
const setLocaleHandler = function(resp) {
if (resp && resp.status === "SUCCESS") {
console.log("Language updated successfully!");
// Example: Trigger a page reload or update your UI text automatically.
} else {
const errorMsg = resp ? resp.message : "Failed to set locale.";
console.error("Error updating language:", errorMsg);
}
};
// 2. CORE FLOW
// Fetch the available languages as soon as the app loads
nativelyLocale.getLocales(getLocalesHandler);
// Later, when a user clicks a "Change Language" button in your UI
const userSelectedLanguage = "fr";
// nativelyLocale.setLocale(userSelectedLanguage, setLocaleHandler);
// --- Localization. Quick Start & Flow. End ---
```
{% endtab %}
{% endtabs %}
### Live Demo & Editor Example
{% tabs %}
{% tab title="Bubble.io" %}
To see a working implementation of the Localization feature we highly recommend exploring our demo application. You can test the live functionality or open the Bubble Editor to inspect the exact workflow configurations and reverse-engineer the setup for your own app.
* [View Live Demo](https://nativelyqa.bubbleapps.io/version-test/localization)
* [Inspect in Bubble Editor](https://bubble.io/page?id=nativelyqa\&test_plugin=1654595882459x381599056563798000_current\&tab=Design\&name=localization\&type=page\&elements=cnGPW0)
{% endtab %}
{% endtabs %}
### Troubleshooting
If the feature isn't behaving as expected, the [Debug Console](/guides/integration/debug-console.md) is your best friend. It reveals the conversation between your web app and the native app.
If you cannot resolve the issue using the logs, our team is here to help. To solve your issue on the first reply, we require a Standardized Bug Report based on your debug data.
Your report must include:
1. App ID: Provide the unique ID found in Natively Dashboard > Settings.
2. Actual Behavior: A clear description of what is happening (or not happening).
3. Expected Behavior: A clear description of what the app should be doing.
4. Steps to Reproduce: A list of the exact actions needed to trigger the error.
5. Console Screenshot: A capture of the Debug Console showing the specific error logs.
6. Logic Configuration: Screenshots of the specific logic where the error occurs (e.g., Bubble workflows, API connectors, or code snippets).
7. Test Credentials: If the issue requires a login to reproduce, provide a set of working test credentials (User/Pass).