> For the complete documentation index, see [llms.txt](https://docs.buildnatively.com/llms.txt). Markdown versions of documentation pages are available by appending `.md` to page URLs; this page is available as [Markdown](https://docs.buildnatively.com/natively-platform/features/purchases.md).
# In-App Purchases
Sell digital subscriptions and one-time products inside your app using Google's and Apple's native purchase systems.
## What are In-App Purchases?
Natively provides built-in support for [RevenueCat](https://www.revenuecat.com/?utm_medium=referral\&utm_source=solp\&utm_campaign=natively\&utm_content=partner) to handle in-app purchases and subscriptions across iOS and Android. RevenueCat manages purchase validation, receipt handling, and subscription status for you, so you don't have to build and maintain this infrastructure yourself.
{% hint style="danger" %}
Apple and Google require apps to use their native in-app purchase systems - not external payment processors like Stripe - for digital goods, content, and subscriptions sold within the app. Physical goods and real-world services are the main exception. See [How to use](#know-when-stripe-is-and-isnt-allowed) for more information.
{% endhint %}
## Prerequisites
{% hint style="success" %}
This feature requires the **Unlimited** or **Lifetime** plan. [See all plans](/getting-started/subscription-plans.md)
{% endhint %}
* A [RevenueCat](https://www.revenuecat.com/?utm_medium=referral\&utm_source=solp\&utm_campaign=natively\&utm_content=partner) account.
* **iOS:**
* An [Apple Developer](https://developer.apple.com/account) account.
* Your iOS app is already [published](/natively-platform/app-info/ios-build.md) in the Natively Dashboard.
* **Android:**
* A [Google Play Developer](https://play.google.com/console) account.
* Your Android app is already [published](/natively-platform/app-info/android-build.md) in the Natively Dashboard.
## App Stores Product Configuration
Before RevenueCat can validate purchases, your subscription or one-time-purchase products must exist in Google Play Console (for Android) and/or App Store Connect (for iOS).
{% tabs %}
{% tab title="Google Play Console" %}
{% hint style="danger" %}
Your Google Play Console account must have a **Google Merchant account** configured before you can sell in-app products or subscriptions. If you haven't set this up yet, Google Play will prompt you to configure it when you first try to create a product.
{% endhint %}
{% hint style="info" %}
If you don't see an option to create subscriptions or in-app products yet, upload a build first - create a release in a **Closed testing** track and upload Android **.AAB** file from Natively Dashboard.
{% endhint %}
1. Open your app in [Google Play Console](https://play.google.com/console) and go to **Monetize with Play** > **Products**.
2. Follow [RevenueCat's Android Product Setup](https://www.revenuecat.com/docs/getting-started/entitlements/android-products?utm_medium=referral\&utm_source=solp\&utm_campaign=natively\&utm_content=partner) guide to create your subscription or in-app products.
3. Confirm your subscription products show as **Active** in Google Play Console.
{% endtab %}
{% tab title="App Store Connect" %}
{% hint style="danger" %}
Your **Paid Applications Agreement** must be signed before you can set up or test any in-app purchases. In **App Store Connect**, go to the **Business** module and sign the latest version of the agreement. You'll also need to complete the **Tax** and **Banking** tabs, with a linked bank account showing a **Clear** status - in-app purchases won't work in sandbox or production until all of this is complete.
{% endhint %}
1. Open [App Store Connect](https://appstoreconnect.apple.com/) and navigate to your app.
2. Follow [RevenueCat's iOS Product Setup](https://www.revenuecat.com/docs/getting-started/entitlements/ios-products?utm_medium=referral\&utm_source=solp\&utm_campaign=natively\&utm_content=partner) guide to create your subscription or one-time purchase products.
3. Confirm each product's state shows **Ready to Submit** before it can be used - even for sandbox testing.
{% endtab %}
{% endtabs %}
## RevenueCat Configuration
With your store products created, connect RevenueCat to each store so it can manage the full purchase lifecycle on your behalf.
{% stepper %}
{% step %}
#### Create your RevenueCat project
1. Sign up or log in at [RevenueCat](https://www.revenuecat.com/?utm_medium=referral\&utm_source=solp\&utm_campaign=natively\&utm_content=partner).
2. Click **New Project**, give it a name - typically your app's name - and confirm.
Each RevenueCat project can hold one or more apps (e.g., your iOS and Android apps), and is where all your Products, Entitlements, Offerings, and API Keys will live.
{% endstep %}
{% step %}
#### Add and connect your app(s)
1. In your RevenueCat project, go to **Apps & providers** in the left sidebar.
2. Click **New app configuration**.
3. Select **Google Play Store** for Android, and **App Store** for iOS.
4. Configure the platforms:
{% tabs %}
{% tab title="Google Play Store" %}
1. Enter the Android app **Package Name** (Bundle ID) configured in your Natively Dashboard.
2. Upload your **Service Account Credentials JSON**. Follow [RevenueCat's Google Play Store service credentials](https://www.revenuecat.com/docs/service-credentials/creating-play-service-credentials?utm_medium=referral\&utm_source=solp\&utm_campaign=natively\&utm_content=partner) guide for the full walkthrough.
3. Click **Save changes**.
{% endtab %}
{% tab title="App Store" %}
1. Enter the iOS app **Bundle ID** configured in your Natively Dashboard.
2. Upload your **In-app Purchase Key**. Follow [RevenueCat's In-App Purchase Key](https://www.revenuecat.com/docs/service-credentials/itunesconnect-app-specific-shared-secret/in-app-purchase-key-configuration?utm_medium=referral\&utm_source=solp\&utm_campaign=natively\&utm_content=partner) guide for the full walkthrough.
3. Add your **App Store Connect API** key. Follow [RevenueCat's App Store Connect API Key](https://www.revenuecat.com/docs/service-credentials/itunesconnect-app-specific-shared-secret/app-store-connect-api-key-configuration?utm_medium=referral\&utm_source=solp\&utm_campaign=natively\&utm_content=partner) guide for the full walkthrough.
4. Click **Save changes**.
{% hint style="info" %}
The **App Store Connect API** key you already created for publishing your iOS app in the Natively Dashboard can be reused here - no need to generate a new one.
{% endhint %}
{% endtab %}
{% endtabs %}
{% endstep %}
{% step %}
#### Set up your Product Catalog
Once your app is connected to each store, bring your products into RevenueCat and organize them.
{% hint style="warning" %}
You must have at least one Entitlement and at least one Offering to use RevenueCat with Natively.
{% endhint %}
{% stepper %}
{% step %}
#### Import your product(s)
1. In RevenueCat, go to **Product Catalog** in the left sidebar, then click **Products**.
2. Find your connected store (App Store or Play Store) and click **+ New**.
3. Click **Import Products** and select the products you created earlier in App Store Connect and/or Google Play Console.
4. Click **Import**.
Repeat for each platform you support - iOS and Android products need to be imported separately, even if they represent the same offer.
Check [RevenueCat's Import Products](https://www.revenuecat.com/docs/offerings/products-overview#import-products-to-revenuecat?utm_medium=referral\&utm_source=solp\&utm_campaign=natively\&utm_content=partner) guide for the full walkthrough.
{% endstep %}
{% step %}
#### Create Entitlement(s)
Entitlements represent the access level a purchase unlocks in your app - for example `premium`, `pro`, or `gold`. Most apps need only one entitlement; create more only if you offer distinct tiers.
1. Go to **Product Catalog** > **Entitlements** and click **+ New Entitlement**.
2. Give it an identifier (e.g. `premium`) and the display name, then click **Add**.
3. Open the entitlement you just created. In the **Associated products** section, click **Attach** and select the products that should unlock it, including the equivalent product from each platform.
Check [RevenueCat's Entitlements](https://www.revenuecat.com/docs/getting-started/entitlements?utm_medium=referral\&utm_source=solp\&utm_campaign=natively\&utm_content=partner) guide for the full walkthrough.
{% hint style="info" %}
Avoid spaces in the identifier - use something like `premium` or `pro_tier` instead of `Premium Access`. The identifier is what your app's code checks against, so keeping it simple and consistent avoids issues later.
{% endhint %}
{% endstep %}
{% step %}
#### Create Offering(s)
Offerings control what your app actually displays to users, and let you change pricing, packaging, or messaging remotely - without shipping an app update.
1. Go to **Product Catalog > Offerings**.
2. RevenueCat automatically creates a **default** offering for you - you can use it, or click **+ New** to create an additional one if you need multiple offerings (e.g., for different user segments).
3. Open the offering and click **Edit** to add/change the **Packages** - these group equivalent products across platforms (e.g., a monthly subscription available on both iOS and Android) under a single identifier your app's code can use.
Check [RevenueCat's Offerings](https://www.revenuecat.com/docs/offerings/overview?utm_medium=referral\&utm_source=solp\&utm_campaign=natively\&utm_content=partner) guide for the full walkthrough.
{% hint style="info" %}
RevenueCat provides predefined package identifiers for common cases (e.g. `$rc_monthly`, `$rc_annual`), or you can create your own custom identifier if none of the predefined ones fit.
{% endhint %}
{% hint style="warning" %}
Package identifiers must be distinct across your offerings - reusing the same identifier in more than one offering can cause unpredictable behavior.
{% endhint %}
{% endstep %}
{% endstepper %}
{% endstep %}
{% step %}
#### Retrieve your Public API Keys
1. In RevenueCat, go to **API Keys** in the left sidebar.
2. Under **SDK API Keys**, copy the **Public API key** for each platform you support.
{% endstep %}
{% endstepper %}
## Natively Dashboard Setup
Before proceeding, make sure you have completed the [RevenueCat Configuration](#revenuecat-configuration) steps above.
1. Open your Natively app dashboard and navigate to **Features** > **In-App Purchases**.
2. Toggle the feature to **Enabled**.
3. Paste the **Public API Keys** you copied from RevenueCat into the respective fields:
* **iOS API Key** - starts with `appl_` .
* **Android API Key** - starts with `goog_`.
4. Click **Save**.
5. Rebuild your app(s).
{% hint style="warning" %}
Make sure you're using your **App Store** (`appl_...`) or **Play Store** (`goog_...`) key - not RevenueCat's **Test Store** key. The Test Store is a separate sandbox environment inside RevenueCat and won't work with purchases in your app.
{% endhint %}
{% hint style="warning" %}
You must rebuild your app for these changes to take effect.
{% endhint %}
## Implementation
Choose your integration method below: **Bubble.io Plugin** (No-Code), **JavaScript SDK** (Code), or **AI Agents** (for AI-powered editors like Lovable, Base44, and Replit).
### Initialization
{% tabs %}
{% tab title="Bubble.io Plugin" %}
**Check Plugin**
Before starting, verify if the Natively plugin is already installed in your Bubble project.
1. Open your Bubble editor and navigate to the Plugins tab in the left sidebar.
2. **Check Installed Plugins:** Look through your list of installed plugins for "Natively iOS & Android app builder".
* If it IS installed: Check the version number. If an update is available (e.g., you see a button saying "Update"), click it to ensure you have the latest features and bug fixes.
* If it is NOT installed: Click the + Add plugins button, search for "Natively", and click Install.
{% endtab %}
{% tab title="JavaScript SDK" %}
**Check SDK**
Before writing any logic, ensure the Natively SDK is correctly installed and up-to-date in your codebase.
1. Open your project's main HTML file (or header settings) and look for the Natively script tag inside the `` section.
2. Install/Update: If missing or outdated, add the following code. You can specify the SDK version in the URL (e.g., `@2.26.0`).
```javascript
```
{% hint style="info" %}
To ensure you are using the most up-to-date version, check the [Natively GitHub releases page](https://github.com/buildnatively/js-sdk/releases) for the latest version number.
{% endhint %}
{% endtab %}
{% tab title="AI Agents" %}
**Initialize the SDK**
AI-powered editors like Lovable, Base44, and Replit use the JavaScript SDK to implement Natively features. Before implementing any feature, the Natively SDK must be initialized in your project.
Copy the line below and paste it into your AI agent to check and set up the Natively SDK in your project.
```
Check if the following Natively SDK script is present in the of index.html. If missing or outdated, add it: For reference: https://docs.buildnatively.com/guides/integration/how-to-get-started https://github.com/buildnatively/js-sdk/releases
```
{% endtab %}
{% endtabs %}
### Setup Logic
{% tabs %}
{% tab title="Bubble.io Plugin" %}
### \[Element] Natively - Purchases
#### Events:
* **Set Customer Success** - fires when **Set Customer ID** completes successfully.
* **Set Customer Failed** - fires when **Set Customer ID** fails.
* **Customer ID Received** - fires when **Get Customer ID** returns a result.
* **Get Price Success** - fires when **Get Package Price** completes successfully.
* **Get Price Failed** - fires when **Get Package Price** fails.
* **Purchase Success** - fires when a purchase completes successfully.
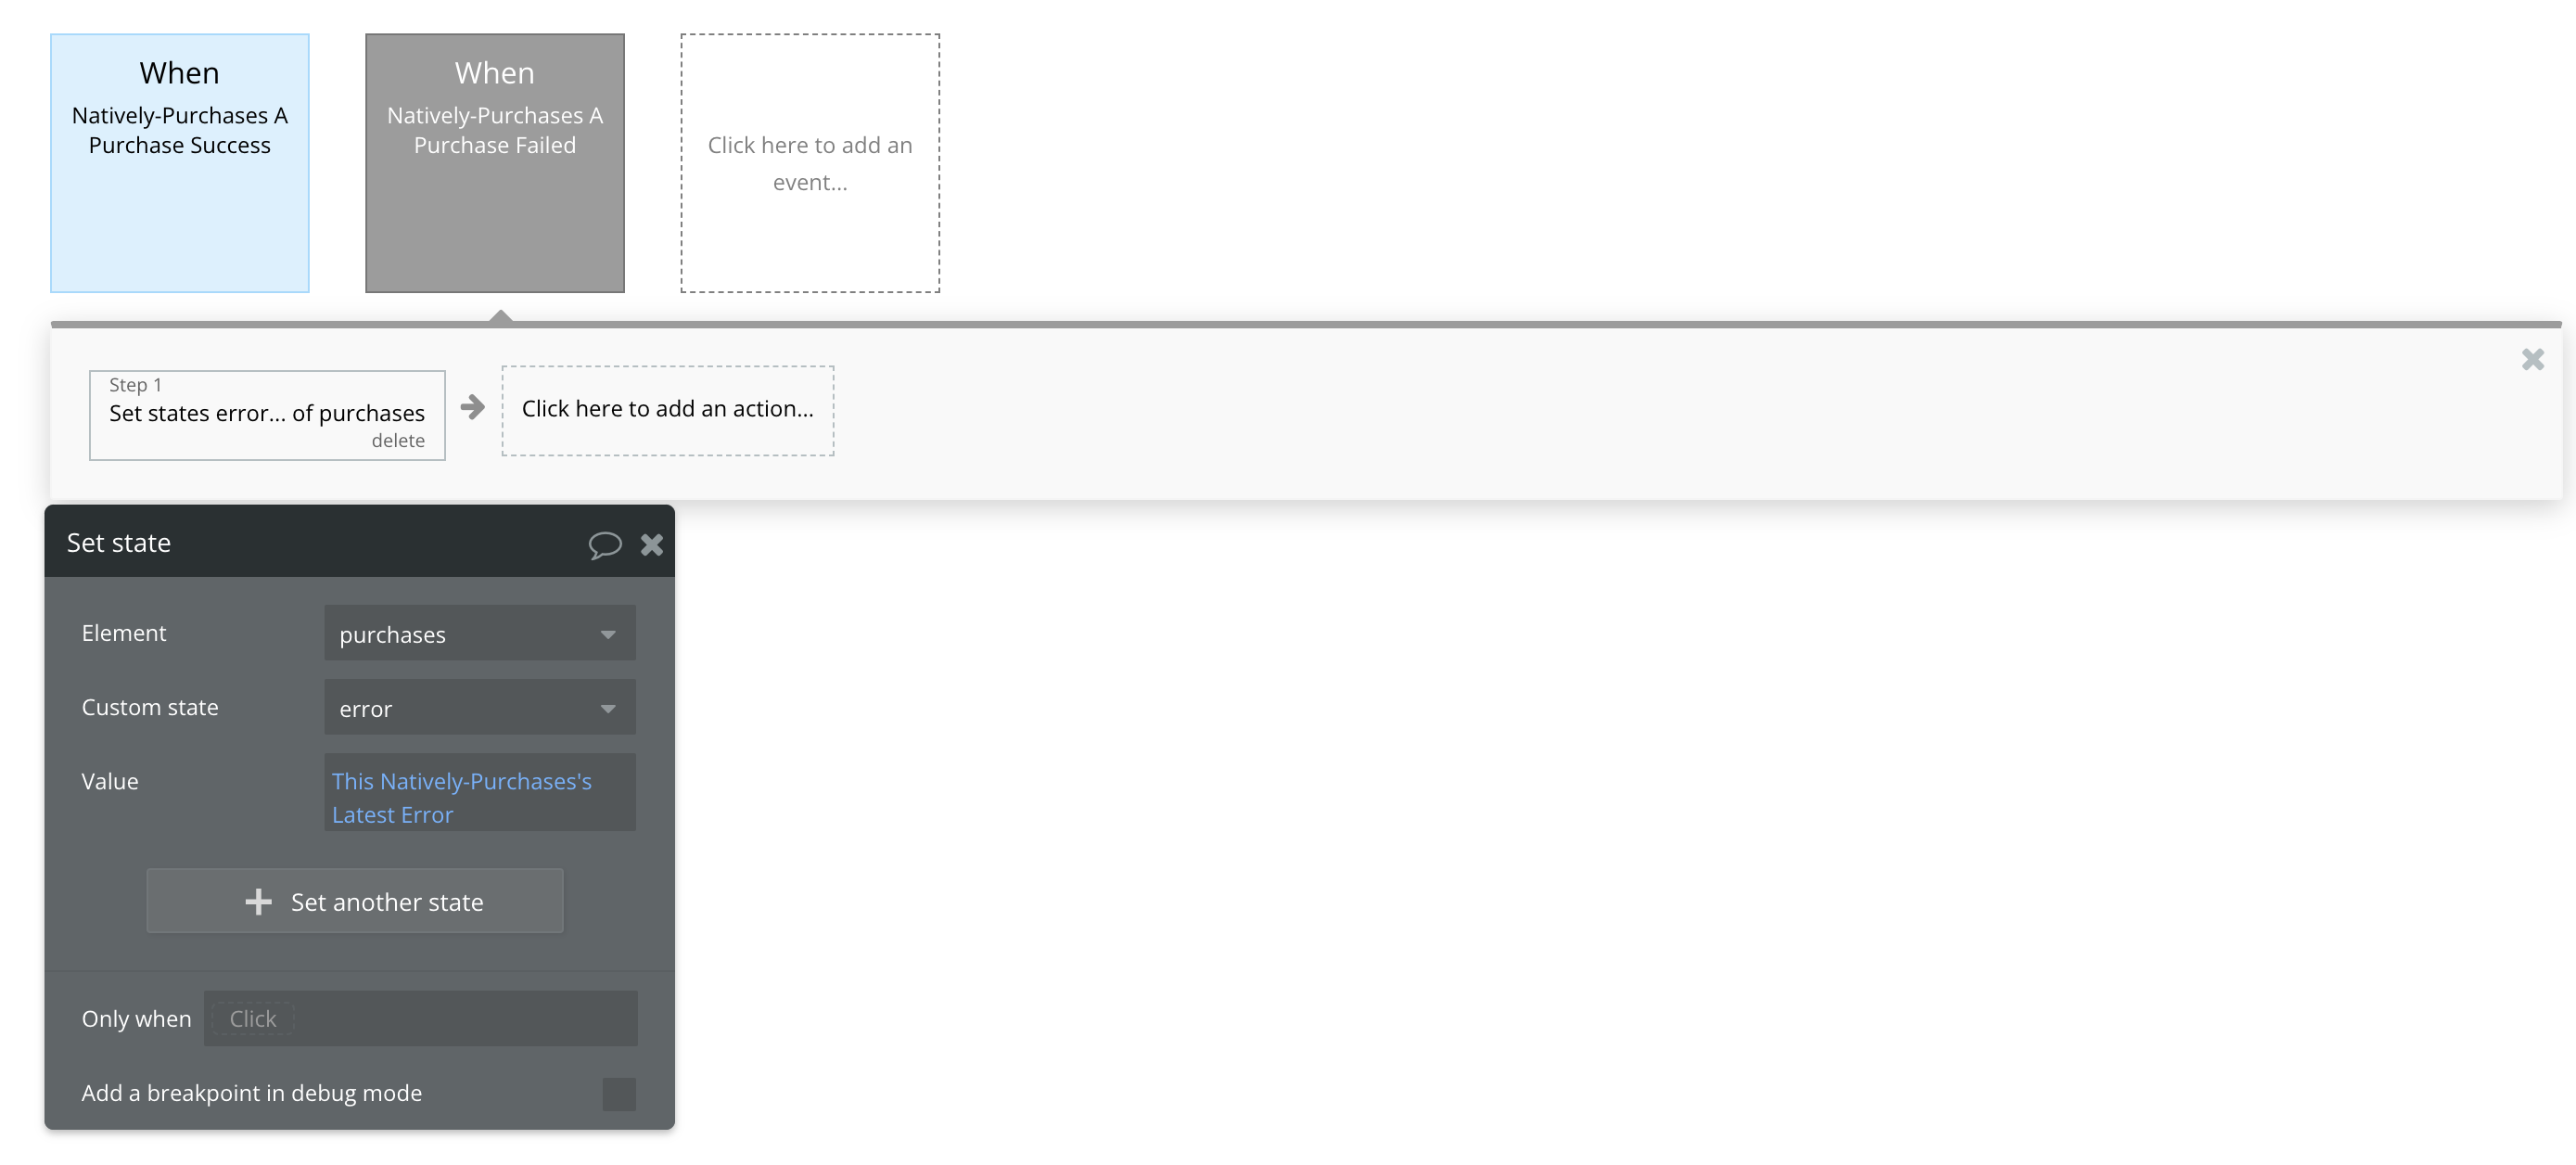
* **Purchase Failed** - fires when a purchase fails due to an error.
* **Purchase Cancelled** - fires when the user backs out of the purchase flow. Handle this separately from **Purchase Failed** - it isn't an error.
* **Restore Purchase Success \[iOS]** - fires when **Restore Purchase** successfully finds and restores prior purchases.
* **Restore Purchase Failed \[iOS]** - fires when **Restore Purchase** fails.
* **Paywall - purchase success** - fires when the user completes a purchase through the paywall.
* **Paywall - cancelled** - fires when the paywall is shown, and the user closes it without taking action.
* **Paywall - error** - fires when the paywall was shown and an error occurred during an operation.
* **Paywall - was not presented** - fires when the paywall doesn't display at all.
* **Paywall - Entitlement ID missing** - fires only when using **Show Paywall if needed** without providing an Entitlement ID.
* **Paywall - Offering ID was not found** - fires only when the provided Offering ID is invalid.
* **Paywall - restore purchase success \[iOS]** - fires when the user restores a purchase from within the paywall.
#### States:
* **Latest Transaction Id** - the transaction ID after **Purchase Package**.
* **Latest Customer Id** - the customer ID after **Set Customer ID** or **Purchase Package**.
* **Latest Error** - empty if no error occurred.
* **Latest GetPrice price** - the raw numeric price, e.g. `9.99`.
* **Latest GetPrice price (Localized)** - the localized price string, e.g. `"$9.99"` or `"9.99 USD"`.
* **Latest GetPrice currency** - the currency code, e.g. `"USD"`, `"UAH"`.
* **Latest PurchasePackage packageId** - the package ID from the most recent purchase attempt.
#### Actions:
* **Purchase Package** - initiates the purchase of a product or subscription:
* **Package ID** - the package to purchase.
* **Old Product ID (Android)** - required only when upgrading or downgrading an active Android subscription. This must be the real store Product ID, not a package ID - retrieve it via **RevenueCat - Verify Subscription** below.
* **Proration (Android)** - controls exactly when the user is charged and how their billing cycle adjusts during an upgrade or downgrade. See [RevenueCat's Proration](https://www.revenuecat.com/blog/engineering/google-proration?utm_medium=referral\&utm_source=solp\&utm_campaign=natively\&utm_content=partner) documentation for a full breakdown.
* **Set Customer ID** - links your user's ID to a RevenueCat customer:
* **Customer Identifier** - recommended to use your Current User's unique ID, so purchases are tied to the same account across devices.
* **Reset Customer ID** - unlinks the current Customer ID from this device.
* **Get Package Price** - retrieves the price for a specific package.
* **Get Customer ID** - retrieves the current customer ID.
* **Show Paywall** - displays a RevenueCat paywall:
* **Offering ID** - optional; shows this specific offering instead of the default.
* **Show Paywall if needed** - displays a paywall only if the user doesn't already have the specified entitlement:
* **Offering ID** - optional; shows this specific offering instead of the default.
* **Entitlement ID** - required.
* **Restore Purchase \[iOS]** - restores previous purchases tied to the user's App Store account. RevenueCat handles the underlying restore logic automatically.
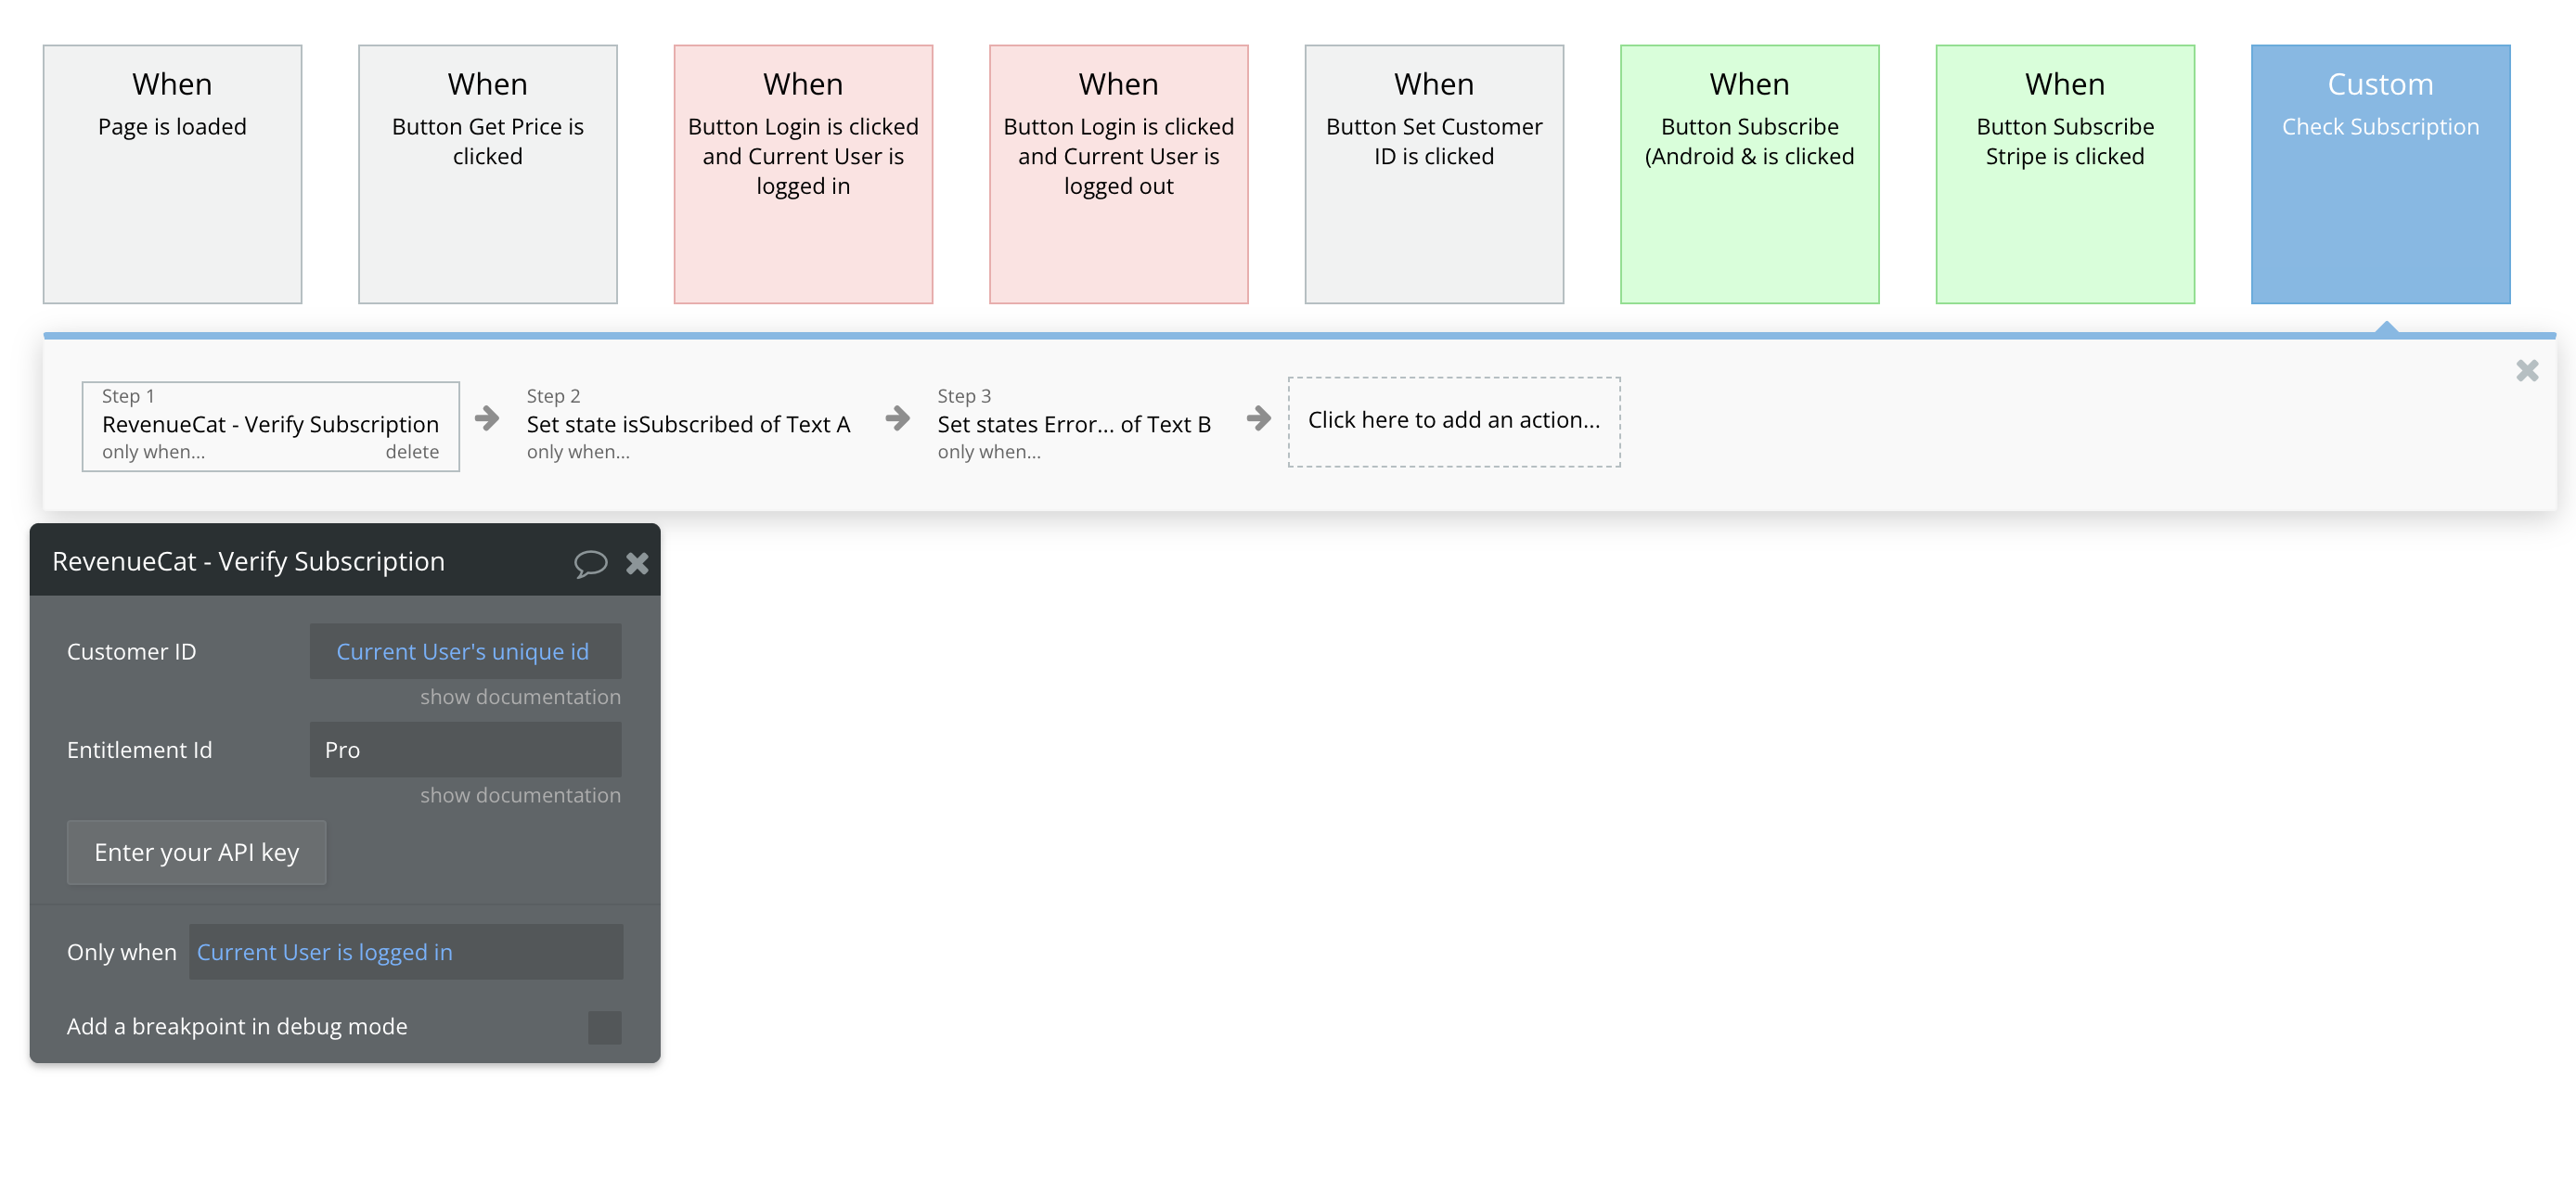
#### RevenueCat - Verify Subscription
{% hint style="info" %}
Unlike the actions above, this checks entitlement status directly against RevenueCat's servers rather than through the Natively SDK - useful for confirming a user's real subscription state, or for retrieving the store Product ID needed for Android upgrades/downgrades.
{% endhint %}
{% hint style="info" %}
This action requires your RevenueCat **Secret API Key** - a different key from the Public API Keys used in Natively Dashboard Setup. Add it as `revenuecat_apiKey` in the Bubble plugin settings. Find it under **RevenueCat App** > **API keys** > **Secret API keys**, and confirm you're using an **API Key V1** - other versions won't work.
{% endhint %}
* **Customer ID** - the RevenueCat user ID used during **Set Customer ID**. If no customer exists with this ID, RevenueCat creates a new one.
* **Entitlements ID** - the entitlement identifier to check.
#### Returns:
* **Product ID** - the store product ID tied to the active entitlement.
* **Purchase Date**
* **Grace Period Expires Date**
* **Expiration Date**
* **Is Active** - Yes/No. Yes - when **Expiration Date** is after the current date.
* **Error** - empty text if no error occurred.
{% endtab %}
{% tab title="JavaScript SDK" %}
```javascript
// ============================================================================
// NATIVELY IN-APP PURCHASES - DOCUMENTATION & EXAMPLES
// ============================================================================
const purchases = new NativelyPurchases();
// ============================================================================
// ALL AVAILABLE METHODS
// ============================================================================
// purchases.login(userId, userEmail, callback)
// - Links your app user to a RevenueCat customer.
// - userId: string — a stable internal ID, recommended to use the same
// value across web and mobile for the same user.
// - userEmail: string — optional.
//
// purchases.logout(callback)
// - Unlinks the current user, reverting to an anonymous RevenueCat ID.
//
// purchases.customerId(callback)
// - Retrieves the current customer ID. Useful when you're not explicitly
// linking the user via login().
//
// purchases.restore(callback)
// - Restores previous purchases tied to the user's App Store / Google Play
// account. Especially important on iOS.
//
// purchases.purchasePackage(packageId, callback, oldProductId, prorationMode)
// - Purchases a specific package.
// - packageId: string — e.g. "$rc_monthly".
// - oldProductId: string — optional. Android only. Required when upgrading or
// downgrading an active subscription. This must be the real store
// Product ID (e.g. "com.company.app.premium:monthly"), not a package ID
// like "$rc_monthly" — retrieve it from the platformProductId field
// returned by getOfferings().
// - prorationMode: string — optional. Android only. Controls when the user is
// charged and how their billing cycle adjusts. Supported values:
// "immediateWithoutProration" — (WITHOUT_PRORATION);
// "immediateWithTimeProration" — (WITH_TIME_PRORATION);
// "immediateAndChargeFullPrice" — (CHARGE_FULL_PRICE);
// "immediateAndChargeProratedPrice" — (CHARGE_PRORATED_PRICE);
// "deferred" — (DEFERRED);
// See RevenueCat's Proration Documentation for a full breakdown:
// https://www.revenuecat.com/blog/engineering/google-proration/
//
// purchases.packagePrice(packageId, callback)
// - Retrieves the price for a specific package.
// - packageId: string
//
// purchases.showPaywall(shouldShowCloseButton, offeringId, callback)
// - Displays a RevenueCat paywall.
// - shouldShowCloseButton: boolean — may be overridden by the paywall template.
// - offeringId: string — optional; shows this offering instead of the default.
//
// purchases.showPaywallIfNeeded(entitlementId, shouldShowCloseButton, offeringId, callback)
// - Displays a paywall only if the user doesn't already have the specified
// entitlement.
// - entitlementId: string — required.
// - shouldShowCloseButton: boolean — may be overridden by the paywall template.
// - offeringId: string — optional; shows this offering instead of the default.
//
// purchases.getOfferings(callback)
// - Retrieves all configured offerings and their available packages,
// including live pricing — useful for building a fully custom purchase
// UI without relying on RevenueCat's paywall templates.
// ============================================================================
// CALLBACK RESPONSE FIELDS - login
// ============================================================================
// resp.status: "SUCCESS" | "FAILED"
// resp.customerId: string — present on SUCCESS
// ============================================================================
// CALLBACK RESPONSE FIELDS - logout
// ============================================================================
// No response payload.
// ============================================================================
// CALLBACK RESPONSE FIELDS - customerId
// ============================================================================
// resp.status: "SUCCESS" | "FAILED"
// resp.customerId: string — present on SUCCESS
// resp.error: string | null — present on FAILED
// ============================================================================
// CALLBACK RESPONSE FIELDS - restore
// ============================================================================
// resp.status: "SUCCESS" | "FAILED"
// resp.customerId: string — present on SUCCESS
// resp.error: string | null — present on FAILED
// ============================================================================
// CALLBACK RESPONSE FIELDS - purchasePackage
// ============================================================================
// resp.status: "SUCCESS" | "CANCELLED" | "FAILED"
// resp.packageId: string — present on SUCCESS
// resp.error: string | null — present on FAILED
// Note: CANCELLED means the user backed out of the purchase flow — this is
// not an error and shouldn't be treated as one.
// ============================================================================
// CALLBACK RESPONSE FIELDS - packagePrice
// ============================================================================
// resp.status: "SUCCESS" | "FAILED"
// resp.packageId: string
// resp.price: number — e.g. 0.99
// resp.currency: string — e.g. "EUR"
// resp.localizedPrice: string — e.g. "€0.99"
// resp.error: string | null — present on FAILED
// ============================================================================
// CALLBACK RESPONSE FIELDS - showPaywall / showPaywallIfNeeded
// ============================================================================
// resp.status: "SUCCESS" | "FAILED"
// resp.message: "purchased" | "restored" | "cancelled" | "not_presented" | "error"
// — describes the paywall outcome; can appear alongside either status.
// resp.error: string — present on some FAILED cases, e.g. "offering_not_found",
// or "entitlement_id_missing" (showPaywallIfNeeded only, when entitlementId
// is missing)
// ============================================================================
// CALLBACK RESPONSE FIELDS - getOfferings
// ============================================================================
// resp.status: "SUCCESS" | "FAILED"
// resp.offerings: object — keyed by offering identifier, each containing:
// identifier: string
// serverDescription: string
// availablePackages: array of:
// identifier: string — e.g. "$rc_monthly"
// platformProductId: string — the real store product ID
// productTitle: string
// productDescription: string
// price: number
// currencyCode: string
// localizedPriceString: string
// resp.error: string — present on FAILED
// --- In-App Purchases. Identity Management. Start ---
const userId = "sdfdsr-2345-3rsd-fsd3432";
const userEmail = "email@example.com";
const login_callback = function (resp) {
if (resp.status === "SUCCESS") {
console.log("Linked to RevenueCat customer:", resp.customerId);
}
};
purchases.login(userId, userEmail, login_callback);
const logout_callback = function () {
console.log("Logged out of RevenueCat.");
};
purchases.logout(logout_callback);
const customer_id_callback = function (resp) {
if (resp.status === "SUCCESS") {
console.log("Current customer ID:", resp.customerId);
}
};
purchases.customerId(customer_id_callback);
// --- In-App Purchases. Identity Management. End ---
// --- In-App Purchases. Direct Purchase. Start ---
const packageId = "$rc_monthly";
const purchase_callback = function (resp) {
if (resp.status === "SUCCESS") {
console.log("Purchased package:", resp.packageId);
// Call your backend to refresh entitlement state before unlocking access.
} else if (resp.status === "CANCELLED") {
console.log("User cancelled the purchase.");
} else {
console.log("Purchase failed:", resp.error);
}
};
purchases.purchasePackage(packageId, purchase_callback);
// --- In-App Purchases. Direct Purchase. End ---
// --- In-App Purchases. Android Upgrade/Downgrade. Start ---
const newPackageId = "$rc_annual";
const oldProductId = "com.company.app.premium:monthly"; // retrieved from getOfferings()'s platformProductId field, not a package ID
const prorationMode = "immediateAndChargeProratedPrice"; // upgrading; use "deferred" for downgrades
const upgrade_callback = function (resp) {
if (resp.status === "SUCCESS") {
console.log("Plan changed to:", resp.packageId);
}
};
purchases.purchasePackage(newPackageId, upgrade_callback, oldProductId, prorationMode);
// --- In-App Purchases. Android Upgrade/Downgrade. End ---
// --- In-App Purchases. Package Price. Start ---
const price_callback = function (resp) {
if (resp.status === "SUCCESS") {
console.log(resp.localizedPrice); // e.g. "€0.99"
}
};
purchases.packagePrice(packageId, price_callback);
// --- In-App Purchases. Package Price. End ---
// --- In-App Purchases. Restore. Start ---
const restore_callback = function (resp) {
if (resp.status === "SUCCESS") {
console.log("Purchases restored for customer:", resp.customerId);
}
};
purchases.restore(restore_callback);
// --- In-App Purchases. Restore. End ---
// --- In-App Purchases. Paywalls. Start ---
const paywall_callback = function (resp) {
console.log(resp.status, resp.message);
// e.g. "SUCCESS" "purchased", "FAILED" "cancelled", "FAILED" "not_presented"
};
const offeringId = "default"; // optional — omit to use the default offering
const showCloseButton = true; // may be overridden by the paywall template
purchases.showPaywall(showCloseButton, offeringId, paywall_callback);
const entitlementId = "premium"; // required
purchases.showPaywallIfNeeded(entitlementId, showCloseButton, offeringId, paywall_callback);
// --- In-App Purchases. Paywalls. End ---
// --- In-App Purchases. Get Offerings. Start ---
const offerings_callback = function (resp) {
if (resp.status !== "SUCCESS") {
console.log("Failed to fetch offerings:", resp.error);
return;
}
const defaultOffering = resp.offerings["default"];
defaultOffering.availablePackages.forEach((pkg) => {
console.log(pkg.identifier, pkg.productTitle, pkg.localizedPriceString);
});
};
purchases.getOfferings(offerings_callback);
// --- In-App Purchases. Get Offerings. End ---
```
{% endtab %}
{% tab title="AI Agents" %}
AI-powered editors like Lovable, Base44, and Replit use the JavaScript SDK to implement Natively features.
Copy the line below and paste it into your AI agent.
{% hint style="warning" %}
Before using this prompt, gather your own project-specific values from RevenueCat: your **Package IDs** (e.g. `$rc_monthly`), **Entitlement ID** (e.g. `premium`), and **Offering ID** if you're not using the default. Include these in your feature description so the AI agent uses your actual values instead of placeholders.
{% endhint %}
[Your feature description] using the Natively In-App Purchases SDK: const purchases = new NativelyPurchases(); purchases.login(userId, userEmail, callback) links the app user to a RevenueCat customer — userId required, userEmail optional — returning resp.status ("SUCCESS" or "FAILED") and resp.customerId on success. purchases.logout(callback) reverts to an anonymous RevenueCat ID, no response payload. purchases.customerId(callback) retrieves the current customer ID, returning resp.status, resp.customerId on success, resp.error on failure. purchases.restore(callback) restores previous purchases, returning resp.status, resp.customerId on success, resp.error on failure — important on iOS. purchases.purchasePackage(packageId, callback, oldProductId, prorationMode) purchases a package — packageId required; oldProductId and prorationMode optional, Android-only, required together when upgrading/downgrading an active subscription (oldProductId must be the real store product ID from getOfferings()'s platformProductId field, not a package ID). prorationMode accepts: "immediateWithoutProration", "immediateWithTimeProration", "immediateAndChargeFullPrice", "immediateAndChargeProratedPrice", or "deferred" (typically "immediateAndChargeProratedPrice" for upgrades, "deferred" for downgrades). Returns resp.status ("SUCCESS", "CANCELLED", or "FAILED"), resp.packageId on success, resp.error on failure. purchases.packagePrice(packageId, callback) retrieves pricing, returning resp.status, resp.price (number), resp.currency, resp.localizedPrice on success. purchases.showPaywall(shouldShowCloseButton, offeringId, callback) and purchases.showPaywallIfNeeded(entitlementId, shouldShowCloseButton, offeringId, callback) display a RevenueCat paywall (the second only if the user lacks the given entitlement; entitlementId required for that one) — returning resp.status, resp.message ("purchased"/"restored"/"cancelled"/"not_presented"/"error"), and resp.error on some failures. purchases.getOfferings(callback) retrieves all offerings and packages with live pricing, returning resp.status and resp.offerings (keyed by offering identifier, each with availablePackages containing identifier, platformProductId, productTitle, productDescription, price, currencyCode, localizedPriceString). For reference: https://docs.buildnatively.com/natively-platform/features/purchases.md
{% hint style="warning" %}
Replace the placeholder at the beginning with a description of what you want to build - for example: "Add a paywall that shows monthly and annual subscription options, links to the user's account on login, and lets them restore purchases".
{% endhint %}
{% endtab %}
{% endtabs %}
### How to use
#### Know when Stripe is and isn't allowed
Apple and Google require digital goods, content, and subscriptions consumed *within* the app to go through their native purchase systems (IAP) - using Stripe or another processor for these will get your app rejected. The main exception is *physical goods and real-world services* (e.g. a taxi ride, a hotel booking, a physical product) - these can use Stripe or any other payment processor, even inside the app.
#### Only show IAP UI inside the Natively app
Use [Browser Info](/guides/integration/browser-info.md) to detect `isNativeApp`, and only show purchase/paywall UI when `true`. In a regular browser, use your web checkout flow instead (e.g., Stripe).
#### Log in before purchasing, restoring, or fetching offerings
Call `login` with a stable internal user ID as soon as the user is authenticated in your app - ideally the same ID you'd use across web and mobile. This ties purchases to the right customer in RevenueCat from the start, rather than to an anonymous ID that's harder to reconcile later.
#### Never trust the client alone for entitlement access
A `SUCCESS` purchase or restore callback confirms the purchase flow completed - it doesn't guarantee your backend has verified the entitlement yet. Always re-check subscription status server-side (via RevenueCat's REST API, or your own backend synced with RevenueCat) before unlocking premium features.
#### Handle `CANCELLED` differently from `FAILED`
A cancelled purchase means the user backed out - this isn't an error and usually shouldn't show error messaging. Reserve error UI for genuine `FAILED` results.
#### Always offer Restore Purchases, especially on iOS
Users reinstalling the app or switching devices need a way to recover purchases tied to their App Store / Google Play account without paying again.
#### Don't confuse Package ID with Store Product ID
`packageId` (e.g. `$rc_monthly`) is what you pass to `purchasePackage` for a normal purchase. But `oldProductId`, required for Android upgrades/downgrades, must be the real store product ID (e.g. `com.company.app.premium:monthly`) - retrieve it from `platformProductId` in `getOfferings()`'s response, not from a package ID.
#### Don't hardcode prices or product info
Use `getOfferings()` or `packagePrice()` to display live, localized pricing - prices vary by region and can change without a client update.
### How to verify a user's subscription
Never rely on a purchase callback alone as proof of entitlement - always confirm with RevenueCat's own record of the customer's subscription state.
{% tabs %}
{% tab title="Bubble.io Plugin" %}
Use the **RevenueCat - Verify Subscription** action (documented in [Setup Logic](#bubble.io-plugin-1)), which checks a customer's entitlement directly using your RevenueCat Secret API Key.
#### Setup example:
1. **On each user login or first signup**, set the RevenueCat Customer ID to your own user's unique ID using the **Set Customer ID** action.
2. **Purchase a subscription (package)** using the **Purchase Package** action.
3. **Verify the user's subscription** whenever you need to check their entitlement status, using the **RevenueCat - Verify Subscription** action.
4. **If purchases aren't working**, check the **Latest Error** state on the Natively - Purchases element for details.
5. You can also use the [RevenueCat API](https://www.revenuecat.com/reference/basic) directly for other purposes, such as independent validation of purchases.
Step 1
Step 2
Step 3.1
Step 3.2
Step 4
{% endtab %}
{% tab title="Backend (REST API)" %}
Fetch the customer from [RevenueCat's REST API](https://www.revenuecat.com/docs/api-v1?utm_medium=referral\&utm_source=solp\&utm_campaign=natively\&utm_content=partner#tag/customers/operation/subscribers) using your Secret API Key and check whether the relevant entitlement is active.
{% hint style="info" %}
This action requires your RevenueCat **Secret API Key** - a different key from the Public API Keys used in Natively Dashboard Setup. Find it under **RevenueCat App** > **API keys** > **Secret API keys**, and confirm you're using an **API Key V1** - other versions won't work.
{% endhint %}
```http
GET https://api.revenuecat.com/v1/subscribers/{app_user_id}
Authorization: Bearer YOUR_SECRET_API_KEY
```
{% hint style="danger" %}
This call must always happen server-side. Never expose your **Secret API Key** in frontend code - anyone with it could query or manipulate subscriber data for your entire project.
{% endhint %}
The response includes a `subscriber.entitlements` object, keyed by entitlement identifier. Check whether the entitlement you care about is present, and its `expires_date` is null or in the future:
```json
{
"subscriber": {
"entitlements": {
"premium": {
"expires_date": "2026-08-01T00:00:00Z",
"product_identifier": "com.company.app.premium:monthly",
"purchase_date": "2026-07-01T00:00:00Z"
}
}
}
}
```
{% hint style="info" %}
For a more real-time, scalable setup, RevenueCat also supports webhooks that notify your backend the moment a subscription's state changes - useful if you want to keep your own database in sync rather than checking RevenueCat on every request. See [RevenueCat's webhook](https://www.revenuecat.com/docs/integrations/webhooks?utm_medium=referral\&utm_source=solp\&utm_campaign=natively\&utm_content=partner) documentation if you want to build this.
{% endhint %}
{% endtab %}
{% endtabs %}
## Testing
{% hint style="danger" %}
Never use real payment methods to test purchases - always use sandbox/test accounts.
{% endhint %}
**Test on Android** - follow [RevenueCat's Testing purchases in Play Store Sandbox](https://www.revenuecat.com/docs/test-and-launch/sandbox/google-play-store?utm_medium=referral\&utm_source=solp\&utm_campaign=natively\&utm_content=partner) guide for a full walkthrough.
**Test on iOS** - follow [RevenueCat's Testing purchases in App Store Sandbox](https://www.revenuecat.com/docs/test-and-launch/sandbox/apple-app-store?utm_medium=referral\&utm_source=solp\&utm_campaign=natively\&utm_content=partner) guide for a full walkthrough.
## Troubleshooting
Purchases fail, or the paywall doesn't open
Go through this checklist:
* **Check the Debug Console.** Open the [Debug Console](/guides/integration/debug-console.md) to inspect the actual error.
* **Confirm you're using the correct Public API Key.** Use your **App Store** (`appl_...`) or **Play Store** (`goog_...`) key in the Natively Dashboard - not the RevenueCat **Test Store** key.
* **Confirm iOS payment setup is fully complete.** Sandbox purchases fail if your Tax and Banking forms in App Store Connect aren't **Clear**, even with a signed Paid Applications Agreement.
* **Confirm Play Service Credentials have propagated.** New Google Play Service Account credentials can show "Invalid Play Store credentials" for up to 36 hours after being generated.
Restore Purchases returns success, but the website doesn't reflect the access
A successful restore only confirms that RevenueCat recognized prior purchases; your app must still call your backend to re-verify entitlement status and update the UI accordingly. Don't unlock features directly from the restore callback alone.
Android upgrade/downgrade fails, or Google Play shows a duplicate subscription instead of a plan change
Confirm `oldProductId` is the real store Product ID (e.g. `com.company.app.premium:monthly`), not a package ID like `$rc_monthly`. Retrieve the correct value from `platformProductId` in `getOfferings()`'s response or from the RevenueCat **Products** section.
Not working in a web browser or the Natively Preview app
In-App Purchases is a native feature and does not work in a standard web browser or in the Natively Preview app. Test on a real device using a full Natively build.
[^1]: Replace this placeholder